Basement mold root cause diagnosis is the process of identifying the specific moisture source driving mold growth, not just treating what you can see on the surface. Skip this step and the mold comes back, guaranteed. The EPA, the IICRC, and every credible remediation protocol agree: moisture source identification is the foundation of any lasting fix. This guide walks you through the exact inspection steps, tools, and techniques used by professionals so you can accurately diagnose what is feeding the mold in your basement.
What are the common signs of basement mold and moisture problems?
Mold announces itself in two ways: what you see and what you smell. Both are diagnostic clues, and ignoring either one leads to incomplete conclusions.
Visual signs to look for:
- Black, green, or gray spots on walls, floor joists, or stored items
- Fuzzy or powdery growth on drywall, wood framing, or concrete
- Discoloration or staining that reappears after cleaning
- Peeling paint or bubbling drywall, which signals moisture behind the surface
- White crusty deposits on concrete walls (more on this below)
That last item trips up a lot of homeowners. White crusty deposits are usually efflorescence, not mold. Efflorescence is a mineral salt deposit left behind when water moves through concrete and evaporates. It dissolves in water. Mold does not. Scrape the deposit and add a few drops of water. If it dissolves, it is efflorescence. If it stays, you are looking at mold or dirt.
Musty odors are equally telling. Visible mold or a persistent musty odor means mold testing is generally unnecessary. Your nose is already confirming the problem. The priority shifts immediately to finding the moisture source, not confirming whether mold exists.
Hidden mold behind drywall or under carpeting is identifiable by musty odor and moisture mapping even when nothing is visible. If a section of your basement smells musty but looks clean, treat that as a red flag, not a green light.
Pro Tip: Run your hand along the base of basement walls after a heavy rain. Dampness or a cool, clammy feel on the lower 12 inches of drywall points directly to water intrusion at the foundation level.
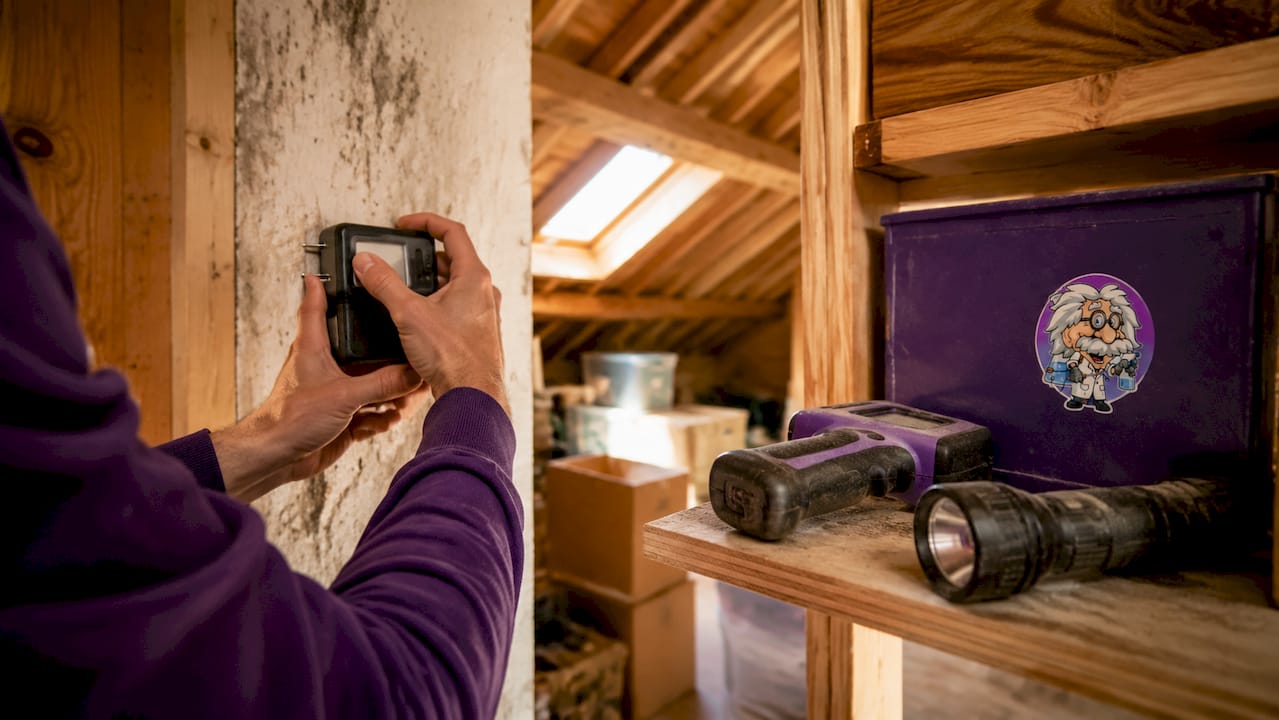
What tools do you need for basement mold diagnosis?
The right equipment turns guesswork into evidence. You do not need a contractor’s full kit, but a few targeted tools make the difference between a thorough inspection and a missed moisture source.
| Tool | Purpose | Approximate Cost |
|---|---|---|
| Pin moisture meter | Measures moisture content in wood and drywall | $20 to $60 |
| Pinless moisture meter | Scans large surface areas without penetration | $50 to $150 |
| Thermal imaging camera | Detects temperature anomalies indicating wet areas | $200 to $500+ |
| Digital hygrometer | Monitors relative humidity in real time | $15 to $40 |
| Bright flashlight or work light | Illuminates dark corners, wall cavities, and crawlspaces | $20 to $50 |
Pin meters give you precise readings in wood framing and drywall. Pinless meters let you scan large wall sections quickly to identify zones worth investigating further. Thermal imaging cameras detect cooler wet areas due to evaporative cooling, but they are not conclusive on their own. Always confirm thermal anomalies with a moisture meter reading.
The digital hygrometer is your environmental baseline tool. Indoor relative humidity should stay between 30% and 50% to inhibit mold growth. Readings above 60% create the condensation conditions mold needs to colonize. That single number tells you whether your basement environment is actively feeding mold growth right now.
Additional supplies worth having:
- N95 respirator and nitrile gloves for personal protection
- Plastic sheeting to isolate dusty or disturbed areas
- Notepad or phone for documenting readings and locations
- Screwdriver for removing outlet covers or access panels
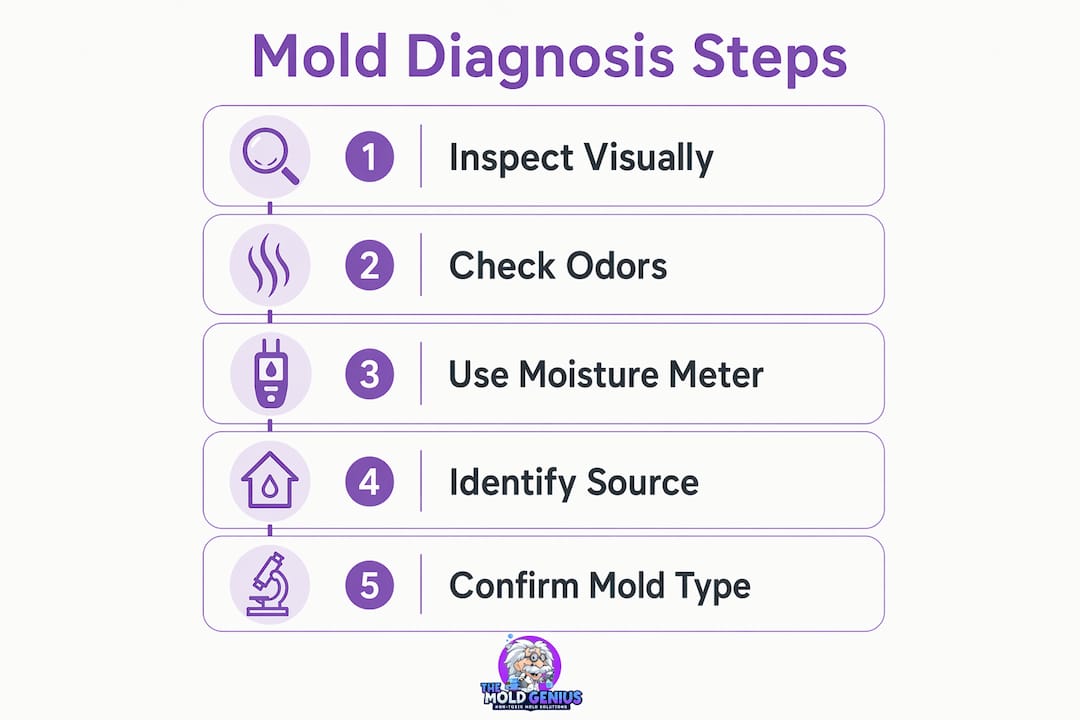
How to carry out a step-by-step basement mold root cause diagnosis
A thorough basement inspection combines visual survey, moisture mapping, and environmental monitoring. Follow these steps in order. Skipping ahead produces incomplete results.
-
Put on your protective gear first. An N95 respirator and nitrile gloves are non-negotiable before you disturb any visible mold or suspected growth areas. Disturbing mold releases spores into the air.
-
Conduct a full visual sweep. Walk every square foot of the basement with a bright work light. Check walls at floor level, the base of any wood framing, the underside of floor joists, window wells, and the area around any floor drains. Photograph everything that looks abnormal.
-
Check plumbing and mechanical systems. Inspect every visible pipe, especially supply lines, drain connections, and the water heater. Look for active drips, mineral staining from past leaks, and corrosion on pipe fittings. A slow drip behind a wall can sustain mold growth for months without detection.
-
Inspect the foundation walls and floor. Look for cracks, gaps at the wall-floor joint, and any signs of water staining. Proper exterior grading requires at least a 1-inch slope per foot for 6 feet away from the foundation. If your yard slopes toward the house, water is pooling against the foundation every time it rains.
-
Use your moisture meter systematically. Start at the corners where walls meet the floor, then work across each wall in a grid pattern. Take readings every 2 to 3 feet. Flag any reading above 16% moisture content in wood or above the manufacturer’s threshold for drywall. Mark high-reading spots with painter’s tape.
-
Run a thermal imaging scan. Scan walls and floors after the basement has been at a stable temperature for several hours. Basement mold diagnosis must account for multiple moisture intrusion mechanisms: liquid water, capillary suction, vapor diffusion, and air movement. Thermal imaging helps distinguish between condensation-driven moisture and active water intrusion because the temperature patterns look different.
-
Record your humidity readings. Place your hygrometer in the center of the basement and let it stabilize for 30 minutes. Take readings at different times of day, including early morning when humidity peaks. Compare readings near suspected moisture sources against the room average.
-
Document everything before you touch it. Write down moisture meter readings, photograph thermal anomalies, and note the location of every suspicious area. This documentation becomes the roadmap for remediation and helps any professional you bring in understand the full picture immediately.
Pro Tip: Check your basement 24 to 48 hours after a heavy rain. Moisture-damaged areas not dried within this window allow mold to colonize. Inspecting post-rain reveals active intrusion points that are invisible during dry conditions.
Common mistakes in basement mold diagnosis and how to avoid them
Most homeowners who miss the root cause of their basement mold problem make one of these six errors.
- Treating efflorescence as mold. White mineral deposits on concrete walls indicate moisture movement, but they are not mold. Misidentifying them leads to unnecessary panic and misdirected cleaning efforts.
- Dismissing musty odors. A musty smell with no visible mold is not a clean bill of health. It is a signal that mold is present somewhere you cannot see yet.
- Stopping the inspection at visible surfaces. Significant mold growth hides behind drywall, under carpet, and inside wall cavities. A surface-only inspection misses the majority of the problem in many cases.
- Treating mold without finding the moisture source. Mold remediation without fixing the moisture source guarantees recurrence. The mold will return within weeks if the water supply is still active.
- Skipping moisture measurements. Visual inspection alone cannot confirm whether a stain is active or old. Moisture meter readings tell you whether a problem is ongoing right now.
- Waiting too long to investigate. Time is a critical variable in mold management.
“The 24 to 48 hour drying window is the most important number in mold prevention. Miss it and you are no longer preventing mold. You are managing it.”
Waiting weeks to investigate a water stain or musty smell converts a contained problem into a remediation project. Act within 48 hours of noticing any sign of moisture intrusion.
DIY inspection vs. professional basement mold diagnosis
Knowing when to stop the DIY process and call a professional is as important as knowing how to start it.
| Situation | DIY Appropriate? | Professional Needed? |
|---|---|---|
| Visible mold under 10 sq ft on hard surfaces | Yes | Optional |
| Musty odor with no visible mold | Partial inspection only | Yes |
| Mold on drywall, insulation, or framing | No | Yes |
| Suspected hidden mold behind walls | No | Yes |
| Mold covering more than 10 sq ft | No | Yes |
Homeowners can safely handle mold remediation themselves only when the affected area is under 10 square feet and on hard, non-porous surfaces. Anything beyond that threshold requires professional assessment and remediation, which averages between $2,367 and $3,753. That cost reflects the equipment, containment protocols, and post-remediation verification that DIY work cannot replicate.
Professional inspectors follow IICRC S520 standards and use laboratory-grade moisture mapping to identify the full extent of contamination. They also conduct air sampling when the situation warrants it, which gives you data on spore counts that no consumer tool can provide. You can use the home air quality mold testing checklist from Themoldgenius to prepare for a professional visit and make the most of the inspection time.
Pro Tip: Before a professional arrives, document your own moisture meter readings and note the locations of any odors or stains. Professionals confirm and expand on your findings. Your documentation speeds up the process and reduces the chance of anything being overlooked.
Key takeaways
Accurate basement mold diagnosis requires identifying the active moisture source, not just treating visible growth, using moisture meters, thermal imaging, and humidity monitoring to map the full extent of the problem.
| Point | Details |
|---|---|
| Start with visual and sensory cues | Musty odors and visible staining are reliable first indicators even before tools are used. |
| Use moisture meters systematically | Grid-pattern readings on walls and floors reveal active moisture intrusion that eyes miss. |
| Confirm thermal findings with meters | Thermal imaging identifies suspect zones, but moisture meters provide the confirming measurement. |
| Fix the moisture source first | Remediation without source control guarantees mold returns within weeks. |
| Know the DIY threshold | Areas under 10 sq ft on hard surfaces are DIY-appropriate; anything larger requires a professional. |
What 25 years of basement inspections actually taught me
Most homeowners come to us after they have already cleaned the mold once. They scrubbed the wall, painted over it, and moved on. Six months later it is back, usually worse. The pattern is consistent enough that I can predict it before I even walk into a basement.
The mistake is not the cleaning. The cleaning is fine. The mistake is treating the mold as the problem when it is actually the symptom. The problem is always moisture. Every single time. I have never walked into a basement where mold was growing without a moisture source feeding it, and I have never seen mold stay gone when that source was left in place.
What surprises most homeowners is how often the moisture source is something they walked past every day without recognizing it. A hairline crack at the base of a foundation wall. A downspout that discharges 18 inches from the house instead of 6 feet. A dryer vent that terminates inside the basement instead of outside. These are not dramatic failures. They are small, slow, consistent moisture inputs that add up over months and years.
The tools matter, but the mindset matters more. Go into the inspection looking for water, not mold. Ask yourself: where could water enter this space? Follow that question to every corner, every pipe, every crack. The mold will show you where the water has been. Your job is to find where it is still coming from.
— Jim
Get a professional basement mold assessment from Themoldgenius

If your inspection has turned up mold, moisture readings above threshold, or a musty odor you cannot trace to a source, the next step is a professional assessment. Themoldgenius serves the Chicagoland area with moisture detection, thermal imaging, and their Pure Cloud Technology dry fogging system, which reaches mold behind walls and above insulation without gutting rooms. Most jobs finish in a single day and homeowners return the same day. Their basement mold removal service addresses the root cause, not just the surface, so the problem does not come back. Free estimates are available. You can also explore their full mold removal and remediation process to understand exactly what a professional assessment covers before you call.
FAQ
What is the first step in diagnosing basement mold?
The first step is a thorough visual inspection combined with a sensory check for musty odors. Both visible growth and persistent odors confirm mold presence and shift the focus to identifying the moisture source.
How do I tell mold apart from efflorescence on concrete?
Apply a few drops of water to the deposit. Efflorescence dissolves in water because it is a mineral salt. Mold remains persistent and does not dissolve, requiring remediation rather than simple cleaning.
What humidity level causes basement mold growth?
Relative humidity above 60% creates the condensation conditions mold needs to colonize. The EPA recommends keeping indoor humidity between 30% and 50% to inhibit mold growth.
Can I diagnose basement mold without professional tools?
A basic inspection using your eyes, nose, and a consumer-grade moisture meter covers a significant portion of the diagnostic process. However, hidden mold behind walls and under flooring requires thermal imaging and professional moisture mapping to locate reliably.
When should I call a professional instead of doing it myself?
Call a professional when the affected area exceeds 10 square feet, when mold is on porous materials like drywall or insulation, or when you detect a musty odor but cannot locate the source through visual inspection.