Mold remediation verification is the structured evaluation process that confirms mold removal was successful and your home is safe to reoccupy. Known formally as Post-Remediation Verification (PRV), this process goes far beyond a contractor’s word or a visual once-over. It combines moisture assessment, air sampling, surface testing, and independent lab analysis to confirm that mold levels have returned to normal background conditions. Industry standard IICRC S520 defines PRV as the final required stage of professional mold remediation, and certified professionals such as Certified Industrial Hygienists (CIH) and Certified Indoor Environmental Consultants (CIEC) are the qualified parties to conduct it.
How mold remediation is verified: the core process
Understanding how mold remediation is verified starts with knowing that PRV requires independent testing before containment barriers are removed. This sequencing matters because once containment comes down, any residual spores can spread through the home, making accurate post-clearance testing impossible.
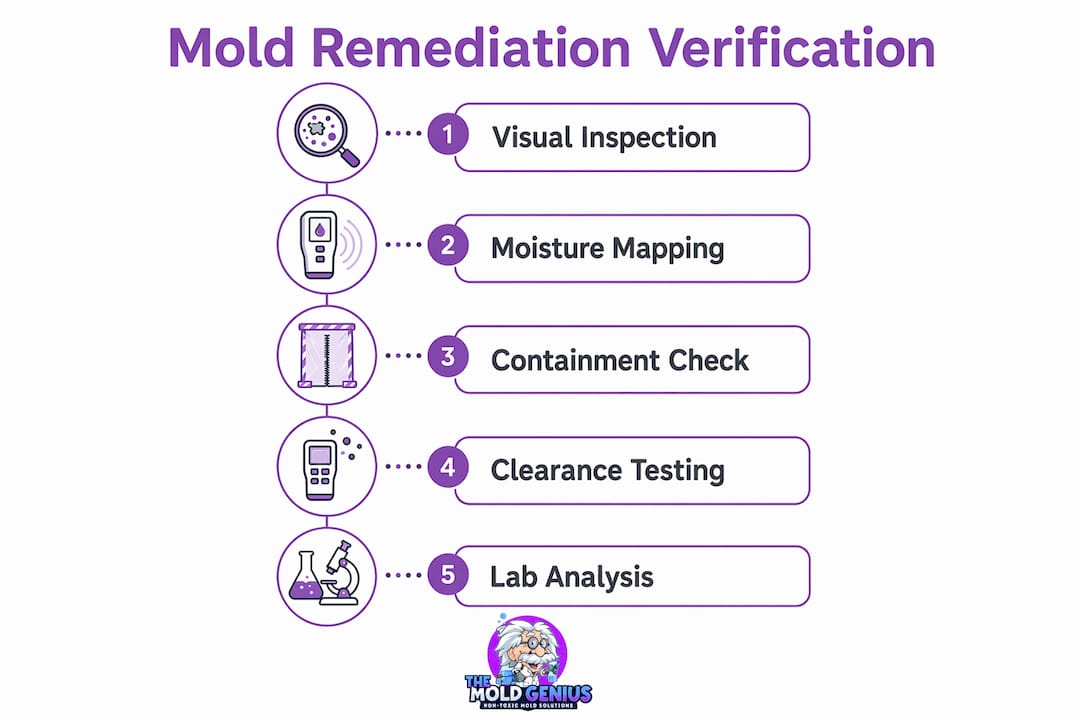
The mold remediation verification process follows a defined sequence:
- Visual inspection. The inspector examines all previously affected areas for visible mold growth, staining, or structural damage. Surfaces must appear clean and dry with no visible contamination.
- Moisture mapping. Using pin and pinless meters, the inspector measures moisture content throughout affected materials. Moisture content above 19% in wood guarantees mold recurrence regardless of how clean the surface looks.
- Air sampling. Spore trap cassettes collect airborne particles at multiple locations inside the remediated area and outdoors. Outdoor samples serve as the baseline reference.
- Surface sampling. Tape lift or swab samples are collected from surfaces to detect residual spore deposits that air sampling might miss.
- Lab analysis. An accredited laboratory analyzes all samples and returns a report identifying spore species and concentrations.
Each step serves a specific purpose. Visual inspection catches obvious failures. Moisture mapping confirms the root cause is resolved. Air and surface sampling detect what you cannot see. Visual inspection alone cannot confirm clearance; lab-tested sampling is required under both IICRC S520 and EPA guidance to identify invisible spores or residual contamination.
The timing of these steps matters too. Testing should occur 24 to 72 hours after remediation is complete, while containment is still in place and the area has had time to stabilize.

Why independent testing is non-negotiable
The single most important rule in the mold removal confirmation process is this: the company that performs the remediation cannot verify its own work. IICRC S520 explicitly forbids the same company conducting both remediation and clearance testing. When a contractor tests their own work, the results are not defensible to insurers, courts, or future buyers.
This conflict of interest is not theoretical. A contractor who fails their own clearance test faces the cost of redoing the job. An independent professional faces no such pressure. Their only obligation is accuracy.
When hiring an Indoor Environmental Professional (IEP) for verification, look for these credentials:
- CIH (Certified Industrial Hygienist) issued by the American Board of Industrial Hygiene
- CIEC (Certified Indoor Environmental Consultant) issued by the American Council for Accredited Certification
- AMRT (Applied Microbial Remediation Technician) issued by the IICRC
- CMC (Certified Microbial Consultant) issued by the American Indoor Air Quality Council
Clearance testing credibility depends on the certifications held by the testing professional. An uncertified inspector’s report carries no weight with insurance companies or in legal disputes.
Pro Tip: Before signing any remediation contract, add a clause requiring independent third-party PRV before containment removal. This one step protects your leverage if mold returns and your claim if you need to involve insurance.
Choosing the right contractor from the start reduces this risk significantly. Resources like questions to ask before hiring a mold removal company can help you screen for companies that welcome independent verification rather than resist it.
What lab results actually tell you
Lab results are the backbone of any mold remediation inspection. Understanding what they mean helps you evaluate whether your home has genuinely been cleared.
The goal of clearance testing is to confirm your home has returned to what IICRC S520 calls Condition 1, meaning normal fungal ecology. In practical terms, this means indoor spore counts are comparable to or lower than outdoor reference samples, and the species composition indoors matches what is naturally present outside. Clearance requires indoor spore counts comparable to outdoor levels with no elevated concentrations of water-damage indicator species like Stachybotrys, Chaetomium, or Aspergillus/Penicillium.
The table below summarizes the main lab test types used in PRV:
| Test type | What it detects | When it’s used |
|---|---|---|
| Spore trap air sample | Airborne spore concentrations and species | Initial clearance, 1 to 4 days post-remediation |
| Surface tape lift | Residual spore deposits on surfaces | Alongside air sampling for targeted areas |
| MSqPCR dust sample | DNA-based detection of mold species in settled dust | Second-phase PRV, 6 or more weeks post-remediation |
The two-phase approach is worth understanding. Standard PRV protocols use spore trap air samples for initial clearance and MSqPCR dust sampling weeks later to confirm whole-building fungal ecology has stabilized. The first phase tells you the remediation worked. The second phase tells you the building has genuinely returned to normal over time.
Pro Tip: Ask your IEP whether they offer a second-phase dust sampling evaluation. For larger remediation projects or homes with a history of moisture problems, this follow-up provides a level of certainty that a single clearance test cannot.
One important limitation: clearance testing is a snapshot in time. If the moisture source that caused the mold is not fully corrected, mold will return even after a clean clearance report. Lab results confirm the remediation succeeded at the moment of testing. They do not guarantee permanent results if the underlying moisture problem persists.
Common pitfalls that undermine verification
Even well-intentioned homeowners make mistakes during the verification stage. Knowing these pitfalls in advance keeps your process on track.
- Testing too early. Sampling before materials have fully dried produces inaccurate results. Residual moisture in walls or flooring can suppress spore counts temporarily, only for mold to reappear weeks later.
- Skipping moisture confirmation. Moisture issues are the root cause of mold, and verification requires confirming the moisture source is fully corrected before testing. A clean air sample means nothing if the wall cavity is still wet.
- Accepting contractor-issued clearance. Any clearance report produced by the remediation company itself is not credible. This is a red flag, not a convenience.
- Relying on visual inspection alone. Surfaces can look clean while harboring spore concentrations that exceed safe thresholds. Sampling is not optional for defensible clearance.
- Skipping verification entirely. Homeowners who skip independent PRV lose leverage if mold reappears and often find their insurance claim has no supporting documentation.
The insurance angle is particularly important. Carriers like Allstate, State Farm, and USAA expect documented clearance when processing mold-related claims. Without an independent PRV report, you may have no recourse if mold returns within months of remediation. Understanding your insurance coverage checklist before remediation begins puts you in a far stronger position.
What to expect during a verification inspection
Knowing what happens during a PRV inspection removes the uncertainty and helps you prepare your home correctly.
- Schedule the inspection 24 to 72 hours after remediation ends, while containment is still in place. This window allows the area to stabilize without letting too much time pass.
- Keep the HVAC system running in its normal operating mode during testing. Shutting it off artificially suppresses airborne spore counts and skews results.
- Expect the inspector to photograph everything. Documentation of pre-sampling conditions, containment integrity, and sampling locations is standard practice.
- Provide access to all affected areas, including attics, crawlspaces, and wall cavities if applicable. Inspectors need to assess every area included in the remediation scope.
- Request a written report that includes photographic evidence, moisture meter readings, lab results, and a formal clearance letter or statement of findings.
The final clearance letter is the document that matters most. It states whether the remediated area meets Condition 1 criteria, identifies any areas requiring additional work, and provides the professional’s signature and credentials. This letter is what you present to your insurer, your real estate agent, or a future buyer. Protecting your home’s equity after a mold event depends on having this documentation in hand.
Key takeaways
Mold remediation is only confirmed complete when an independent certified professional conducts PRV, verifies moisture control, and lab results show indoor spore levels restored to normal fungal ecology.
| Point | Details |
|---|---|
| PRV requires independence | The remediation company cannot verify its own work; hire a separate certified IEP. |
| Moisture must be confirmed first | Wood moisture content must be below 19% before clearance testing is valid. |
| Lab results define clearance | Indoor spore counts must match outdoor baseline levels with no water-damage indicator species. |
| Two-phase testing adds certainty | Initial air sampling plus MSqPCR dust sampling weeks later confirms lasting results. |
| Documentation protects you | A signed clearance letter is required for insurance claims and future real estate transactions. |
What I’ve learned from watching homeowners skip this step
I’ve seen what happens when homeowners take a contractor’s word that the job is done. The mold comes back in three months, the contractor is unreachable, and the insurance company asks for documentation that doesn’t exist. That scenario plays out more often than it should, and it is entirely preventable.
The most common mistake I see is treating PRV as optional. It is not. It is the only way to confirm that what happened behind your walls actually worked. A contractor who resists independent testing is telling you something important about their confidence in their own work.
The second mistake is waiting until after the job is done to think about verification. By then, containment may already be down, samples may be compromised, and your leverage is gone. The time to require independent PRV is before you sign the remediation contract. Put it in writing. Name the requirement explicitly.
I also want to push back on the idea that clearance testing is expensive relative to what it protects. A single PRV inspection costs a fraction of what a second remediation job costs, and it is nothing compared to what a mold-related real estate disclosure or insurance dispute costs. View it as the final quality check on a significant investment in your home and your family’s health. The air quality testing checklist is a good starting point for understanding what that process looks like in a residential setting.
— Jim
Verified mold removal you can count on

Themoldgenius serves homeowners across the Chicagoland area with a process built around getting the job done right and proving it. Their three-phase approach covers diagnosis with thermal imaging and moisture detection, removal using Pure Cloud Technology, and prevention by addressing the root moisture cause. Most jobs wrap up in a single day with same-day return. Themoldgenius works directly with major insurers including Allstate, State Farm, USAA, and Farmers, and their documentation meets the standards insurers and real estate agents require. If you want professional mold remediation backed by a team with 25 or more years of combined experience and 400-plus verified Google reviews, contact Themoldgenius today for a free estimate.
FAQ
What is post-remediation verification (PRV)?
Post-remediation verification is the formal inspection and testing process conducted after mold remediation to confirm the work was successful. It includes visual inspection, moisture assessment, air and surface sampling, and independent lab analysis.
Who should perform mold clearance testing?
Clearance testing must be performed by an independent third-party Indoor Environmental Professional, not the company that did the remediation. Look for credentials such as CIH, CIEC, or AMRT to confirm the inspector is qualified.
How long after remediation should testing occur?
Testing should be scheduled 24 to 72 hours after remediation is complete, while containment barriers are still in place. Testing too early or after containment removal can compromise the accuracy of results.
What does a passing clearance result look like?
A passing result means indoor spore concentrations are comparable to or lower than outdoor reference samples, with no elevated levels of water-damage indicator mold species. This confirms the home has returned to Condition 1 normal fungal ecology per IICRC S520.
Does clearance testing guarantee mold won’t return?
No. Clearance testing confirms the remediation succeeded at the time of testing. If the original moisture source is not fully corrected, mold can return even after a clean clearance report.