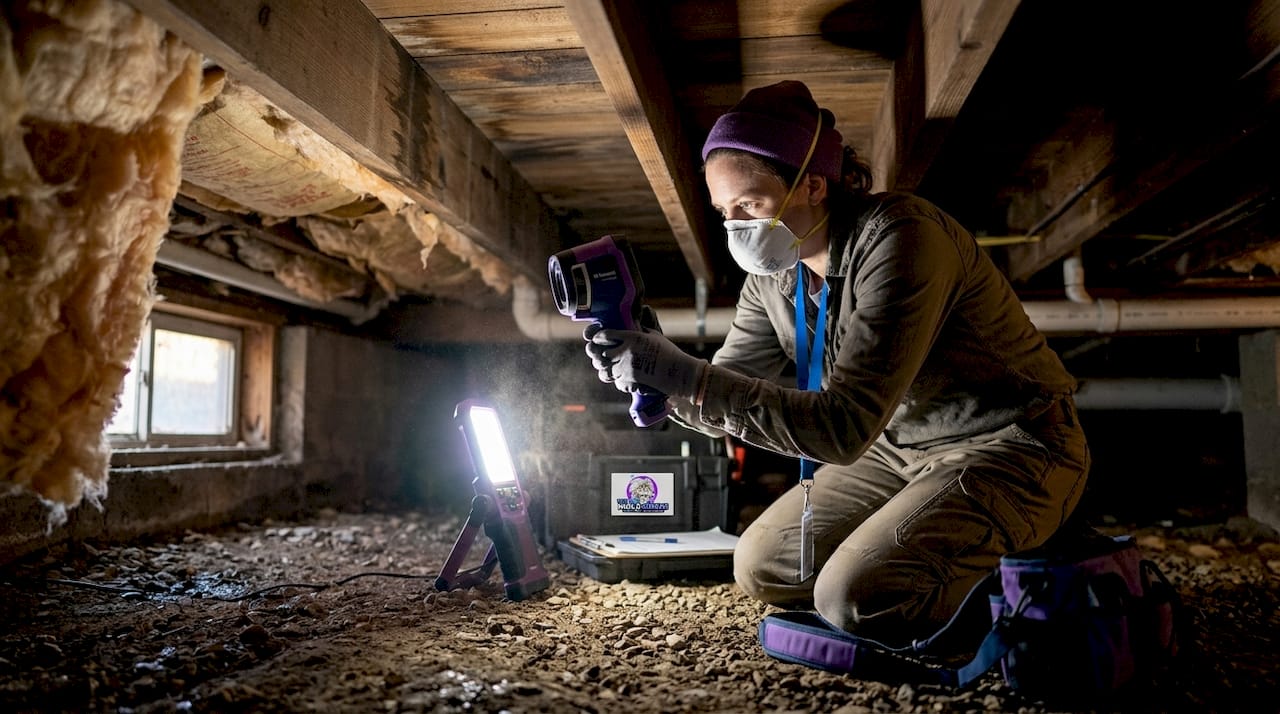
A mold inspection is a professional evaluation that identifies mold growth, moisture sources, and the conditions that allow mold to thrive inside your home. Conducted by a trained inspector using tools like moisture meters, thermal imaging cameras, and selective air sampling, the process gives you a clear picture of what is growing, where it is, and why. Mold inspections aim to determine the presence, location, severity, and remediation steps required. Typical inspections run 2 to 6 hours on site and cost between $300 and $1,000. If you have noticed a musty smell, visible discoloration, or recent water damage, a mold inspection is the most reliable first step you can take.
What is a mold inspection and what does it actually cover?
A mold inspection is not just a quick look around your basement. It is a structured, multi-step assessment designed to find mold and, more critically, the moisture conditions feeding it. Professional inspectors document findings including mold types, moisture sources, and remediation recommendations in a written report you can use for insurance claims, real estate transactions, or contractor guidance.
The inspection covers every area of your home where moisture can accumulate. That means attics, basements, crawlspaces, bathrooms, kitchens, and any wall or ceiling near a plumbing line. Inspectors pay close attention to signs of past or active water intrusion, not just visible mold colonies. A stain on a ceiling tile or warped baseboards can signal a moisture problem that has not yet produced visible mold but will.
The written report you receive at the end is the product that matters most. It tells you what was found, where, how severe it is, and what needs to happen next. For homeowners dealing with insurance claims through carriers like Allstate, State Farm, or USAA, that documentation is often required before any remediation work is approved.
How the mold inspection process works, step by step
A standard mold inspection includes a visual walkthrough, moisture detection with meters or thermal imaging, and lab sampling when the findings warrant it. Here is what that looks like in practice:
-
Initial interview. The inspector asks about your concerns, any known water events, recent repairs, and symptoms you or your family have noticed. This context shapes where they focus their attention.
-
Visual walkthrough. Every moisture-prone area gets examined. The inspector looks for visible mold, water stains, condensation, peeling paint, and musty odors. Attics and crawlspaces are inspected for ventilation problems and insulation issues that trap humidity.
-
Moisture detection. Using moisture meters and infrared thermal imaging cameras, the inspector scans walls, floors, and ceilings for hidden dampness. Thermal imaging reveals temperature differentials that indicate wet building materials even when the surface looks dry.
-
Air and surface sampling. When visual evidence points to a problem or when you need lab confirmation for legal or insurance purposes, the inspector collects air samples or surface swabs. These go to an accredited lab for analysis.
-
Outdoor baseline sampling. A good inspector also collects an outdoor air sample to establish a baseline. Indoor mold spore counts are only meaningful when compared to what is naturally present outside your home.
-
Report delivery. Lab results typically come back within 24 to 48 hours, though full report delivery can take longer depending on the inspector’s workload and the complexity of findings.
Pro Tip: Ask your inspector whether they use thermal imaging as part of their standard process. Inspectors who skip this step may miss moisture pockets behind walls that are the actual source of your mold problem.
Mold inspection vs. mold testing: what is the difference?
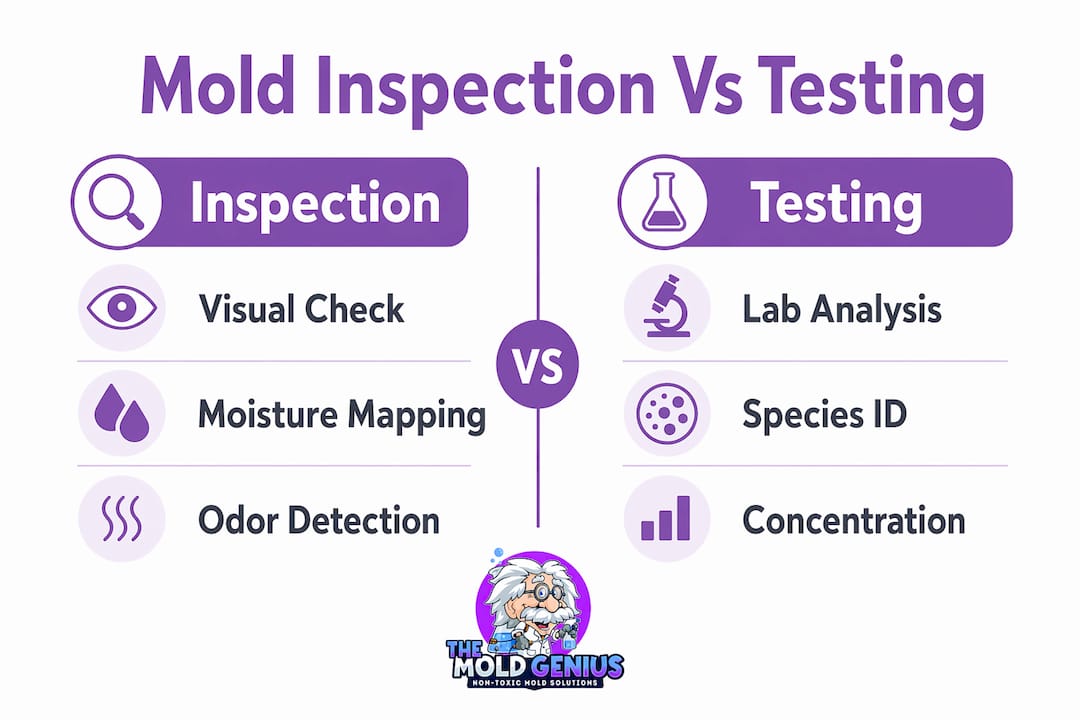
Homeowners often use “mold inspection” and “mold testing” interchangeably, but they describe two different activities. Understanding the distinction helps you ask the right questions and spend your money wisely.
| Mold inspection | Mold testing | |
|---|---|---|
| What it involves | Visual evaluation, moisture mapping, odor detection | Lab analysis of air or surface samples |
| Primary tool | Moisture meters, thermal imaging, trained observation | Spore traps, swabs, accredited laboratory |
| What it tells you | Where mold is, what conditions are causing it | Which mold species are present, at what concentration |
| When it is enough | Most residential situations with visible or suspected mold | Legal disputes, insurance claims, post-remediation verification |
| Reliability | High when combined with moisture mapping | Limited as a standalone indicator |
The CDC and NIOSH are direct on this point: visual inspection and musty odors are more reliable indicators of mold presence than routine short-term air sampling. A negative air test does not mean your home is mold-free. Spore counts fluctuate by the hour depending on air movement, humidity, and whether anyone disturbed the affected area recently.
Mold testing adds genuine value in specific situations. If you are selling a home and a buyer requests documentation, if your insurance carrier requires species identification, or if you want to verify that remediation was successful, lab testing is worth the added cost. For most homeowners who can see or smell a problem, a thorough visual inspection with moisture mapping gives you everything you need to move forward.
Pro Tip: Before any sampling begins, ask your inspector how they plan to identify moisture sources. Without moisture mapping, lab results may tell you what species you have but not why it is growing there, which means remediation will likely fail.
How to prepare your home for a mold inspection
Preparation directly affects the accuracy of your results, especially if air sampling is part of the process. The goal is to let mold spore concentrations stabilize naturally so the samples reflect actual conditions in your home.
- Shut off humidifiers, dehumidifiers, and air purifiers at least 24 hours before the inspection. These devices alter airborne spore concentrations and can skew results in either direction.
- Keep windows and doors closed for 48 hours before the appointment. Opening windows ventilates the space and dilutes indoor air samples, making mold levels appear lower than they are.
- Turn off your HVAC system for at least two hours before the inspector arrives. Running the system circulates air and redistributes spores, which distorts both air and surface sample results.
- Avoid cleaning, vacuuming, or mopping the day before. Cleaning disturbs settled spores and temporarily reduces surface concentrations. Accurate spore concentrations depend on undisturbed conditions.
- Skip outdoor yard work on inspection day. Mowing, raking, or blowing leaves sends outdoor spores into the air, which can contaminate your outdoor baseline sample and make indoor-to-outdoor comparisons unreliable.
- Clear access to all areas. Move boxes away from basement walls, pull furniture away from crawlspace hatches, and make sure the attic access panel is reachable. Inspectors cannot assess what they cannot reach.
- Schedule on a dry day. Rain raises outdoor humidity and can temporarily elevate indoor moisture readings. A dry forecast gives you the cleanest baseline conditions.
If you want a detailed checklist to work from, the mold testing checklist from Themoldgenius walks through each preparation step with specific timing guidance.
What does a mold inspection cost and how long does it take?
Mold inspection costs typically range from $300 to $1,000, with a national average near $680. That range reflects real variation in what is included, not just regional pricing differences.
| Factor | Lower cost | Higher cost |
|---|---|---|
| Home size | Under 1,500 sq ft | Over 3,000 sq ft |
| Scope of testing | Visual inspection only | Multiple air and surface samples |
| Lab analysis | Not included | Included with species identification |
| Specialty areas | Standard rooms only | Attic, crawlspace, or HVAC system |
| Report detail | Basic findings summary | Full documentation for insurance or legal use |
The on-site portion of the inspection runs 2 to 6 hours depending on home size and complexity. Lab results come back within 24 to 48 hours in most cases, but your final written report may take a few additional days. If you are working against a real estate closing deadline or an insurance claim window, confirm the full timeline in writing before the inspection begins. Homeowners who need documentation for a sale should also review the mold pre-sale inspection guide to understand what buyers and agents typically expect.
The upfront cost is real, but it is far smaller than the cost of remediating a problem that was missed, misidentified, or treated without addressing the moisture source. The EPA identifies moisture control as the central goal of any mold inspection. An inspection that skips moisture mapping is not saving you money. It is setting you up for a second round of remediation.
Key takeaways
A mold inspection is only as useful as the moisture mapping behind it. Inspections that skip thermal imaging and moisture detection produce incomplete findings that lead to failed remediation.
| Point | Details |
|---|---|
| Definition matters | A mold inspection evaluates both mold presence and the moisture conditions causing it, not just visible growth. |
| Inspection beats testing alone | CDC and NIOSH confirm visual inspection is more reliable than air sampling as a standalone indicator. |
| Preparation affects accuracy | Closing windows, shutting off HVAC, and avoiding cleaning for 24 to 48 hours before the inspection protects sample integrity. |
| Cost reflects scope | Inspections range from $300 to $1,000; the difference is usually whether lab testing and specialty areas are included. |
| Moisture source is the real target | Remediation without identifying the moisture source will fail. The inspection report must address root cause, not just mold location. |
What 25 years of mold inspections taught me about what homeowners get wrong
Most homeowners who call us have already spent weeks trying to figure out whether they have a real problem. They have Googled the discoloration on their bathroom ceiling, bought a home test kit from a hardware store, and gotten a result that told them almost nothing useful. That experience is frustrating, and it is also completely predictable.
The single biggest mistake I see is treating mold testing as a substitute for moisture investigation. A lab result that says you have Cladosporium at elevated levels is not a remediation plan. It is a data point without context. What you actually need to know is where the water is coming from, how long it has been there, and whether the building materials behind your walls are compromised. That requires thermal imaging, moisture meters, and someone who knows what they are looking at.
The second mistake is assuming that a clean visual inspection means no mold. I have walked into homes where the visible surfaces looked fine and found serious mold growth above insulation in the attic or inside a crawlspace wall cavity. Mold does not always announce itself. That is exactly why thermal imaging is non-negotiable in any inspection I would trust.
If you are choosing an inspector, ask them directly: do you use thermal imaging as part of your standard process, and will your report identify the moisture source? If the answer to either question is no, keep looking. The right questions to ask before hiring anyone in this industry will save you significant time and money.
— Jim
Get a professional mold assessment from Themoldgenius
If your inspection has revealed a mold problem, or if you suspect one and want a definitive answer, Themoldgenius serves homeowners across the Chicagoland area with 25 years of combined experience and over 400 verified Google reviews.

Their three-phase process covers diagnosis using thermal imaging and moisture detection, removal using Pure Cloud Technology (a dry fogging system with hospital-grade hydrogen peroxide and silver ions that reaches mold behind walls and above insulation), and prevention by fixing the root moisture cause. Most jobs are completed in a single day with same-day return. They work directly with major insurance carriers including Allstate, State Farm, USAA, and Farmers. For homeowners ready to move from inspection to resolution, professional mold remediation from Themoldgenius is the next step. Free estimates are available.
FAQ
What is a mold inspection exactly?
A mold inspection is a professional evaluation of your home for mold growth, moisture sources, and the conditions that allow mold to develop. It typically includes a visual walkthrough, moisture detection with meters and thermal imaging, and selective air or surface sampling when warranted.
How is mold testing different from a mold inspection?
Mold testing refers specifically to lab analysis of air or surface samples to identify mold species and concentrations. A mold inspection is the broader process that includes visual assessment and moisture mapping, with testing added selectively when documentation or species identification is needed.
How long does a mold inspection take?
The on-site inspection runs 2 to 6 hours depending on home size and the areas being assessed. If air or surface samples are collected, lab results take 24 to 48 hours, with the full written report following shortly after.
Do I need a mold inspection before selling my home?
A mold inspection is not legally required in most states, but it is strongly recommended before listing. Undisclosed mold can derail a sale, reduce your property value, and create legal liability. A clean inspection report or documented remediation gives buyers confidence and protects you at closing.
Can I skip the inspection and go straight to remediation?
Skipping the inspection means remediating without knowing the moisture source, which is the leading cause of mold returning after treatment. The EPA identifies moisture source identification as the central goal of any mold assessment. Remediation without that foundation is a temporary fix at best.